วิธีทำเอฟเฟกต์ภาพ 3 มิติบน Tiktok | PopSugar Tech สร้างเอฟเฟกต์ภาพ 3 มิติ – Corel Discovery Center
สร้างเอฟเฟกต์ภาพ 3 มิติ
จากนั้นสลับไปที่ ยางลบพื้นหลัง เครื่องมือสำหรับพื้นที่ที่อยู่ใกล้กับเรื่องของคุณ. ที่ ยางลบพื้นหลัง ลบพิกเซลที่มีสีเดียวกันกับที่คุณคลิก. คุณอาจต้องปรับไฟล์ ความอดทน การตั้งค่าใน ตัวเลือกเครื่องมือ Palette ขึ้นอยู่กับว่าสีพื้นหลังของคุณใกล้เคียงกับสีวัตถุของคุณอย่างใกล้ชิดเพียงใด. สีเหลืองสดใสที่เราเลือกสำหรับชั้นพื้นหลังทำให้ง่ายต่อการดูว่าต้องถอดพิกเซลแบบไหน.
นี่คือวิธีที่คุณทำเอฟเฟกต์ภาพ 3 มิติที่เข้ายึดครอง Tiktok
หากคุณทันสมัยอยู่เสมอกับเทรนด์ Tiktok เช่นแฮ็คการแก้ไขภาพถ่าย iPhone หรือไข่เพสโต้ไวรัสเหล่านี้โอกาสที่คุณจะได้เห็นความนิยมใหม่ล่าสุด: เอฟเฟกต์ภาพถ่าย 3 มิติ. เอฟเฟกต์-ซึ่งทำในแอพภายนอก-เปลี่ยนรูปภาพให้เป็นทิวทัศน์สามมิติทำให้พวกเขามีชีวิตและทำให้ดูดีและยอดเยี่ยมจริงๆ. ผู้ใช้ Tiktok กำลังพากย์ภาพ 3 มิติของพวกเขาในเพลง “Phonky Town” โดย Playaphonk และเพิ่มแฮชแท็ก #3dphotoeffect (ซึ่งมีมากกว่าเจ็ดล้านวิว). สุจริตเรา ดังนั้น ที่นี่เพื่อมัน. หากคุณกำลังมองหาที่จะกระโดดขึ้นไปบนเทรนด์นี้เพื่อให้รูปภาพของคุณได้เปรียบเป็นพิเศษให้ทำตามคำแนะนำเหล่านี้:
วิธีการทำเอฟเฟกต์ภาพถ่าย Tiktok 3D
- ดาวน์โหลดแอพ capcut
- เปิดแอพและนำเข้ารูปภาพ
- แตะ “แก้ไข”
- แตะ “สไตล์”
- แตะ “3D Zoom”
- บันทึกลงในม้วนกล้อง
นอกจากนี้คุณยังสามารถอัปโหลดรูปภาพหลายรูปได้ในแต่ละครั้งหากคุณต้องการ. ขอแนะนำให้ทำภาพถ่าย 11 ภาพหากคุณกำลังมองหาที่จะพากย์ให้เป็น “Phonky Town” แต่คุณสามารถเล่นกับเพลงหรือภาพถ่ายจำนวนเท่าใดก็ได้ที่คุณต้องการ.
ก่อนเอฟเฟกต์ภาพ 3 มิติ

แหล่งที่มาของภาพ: Haley Lyndes
หลังจากเอฟเฟกต์ภาพ 3 มิติ
แหล่งที่มาของภาพ: Haley Lyndes
สร้างเอฟเฟกต์ภาพ 3 มิติ
ในบทช่วยสอนนี้เราจะแสดงวิธีเปลี่ยนภาพถ่ายสามัญให้เป็นภาพถ่าย 3 มิติโดยใช้เอฟเฟกต์ที่เรียกว่าเอฟเฟกต์ “ออกนอกขอบเขต”. เทคนิคการแก้ไขรูปภาพนี้จะทำให้ปรากฏราวกับว่าส่วนหนึ่งของรูปภาพของคุณกำลังออกมาจากเฟรม. แม้ว่าผลลัพธ์จะค่อนข้างน่าประทับใจ แต่เทคนิคนี้ค่อนข้างง่าย.

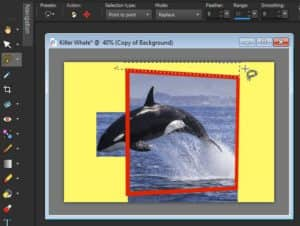
ขั้นตอนที่ 1: เพิ่มพื้นหลังสำหรับรูปภาพ 3D ของคุณ
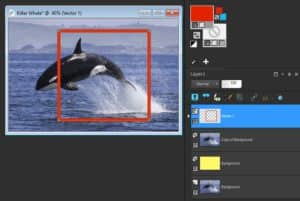
ใน ชั้น พาเล็ตคลิกขวาที่รูปภาพของคุณ (พื้นหลัง เลเยอร์) และเลือก ทำซ้ำ. ด้วยวิธีนี้ภาพถ่ายต้นฉบับของคุณจะยังคงอยู่.
ที่ด้านล่างของ ชั้น Palette คลิกที่ เลเยอร์ใหม่ ไอคอนและเลือก ใหม่ Raster Layer. นี่จะเป็นพื้นหลังของภาพถ่าย 3D.
เปิดใช้งานไฟล์ เติมน้ำท่วม เครื่องมือและเลือกสีที่สดใสและตัดกันในไฟล์ วัสดุ จานสีเช่นสีเหลือง. ใน ตัวเลือกเครื่องมือ จานสีให้แน่ใจ ใช้เลเยอร์ทั้งหมด ไม่ถูกตรวจสอบจากนั้นคลิกที่ภาพด้วยไฟล์ เติมน้ำท่วม เครื่องมือในการเติมเลเยอร์ใหม่ด้วยสีเหลือง.
ใน ชั้น Palette ลากชั้นสีทึบใต้ชั้นภาพถ่ายที่คัดลอกมา. จากนั้นคลิกที่เลเยอร์ภาพถ่ายที่คัดลอกเพื่อให้เป็นเลเยอร์ที่ใช้งานอยู่เพื่อให้วัตถุใหม่จะถูกวางไว้เหนือเลเยอร์นี้.
ขั้นตอนที่ 2: เพิ่มเฟรม
ในการสร้างเฟรมให้เปิดใช้งานไฟล์ สี่เหลี่ยมผืนผ้า เครื่องมือ. ใน วัสดุ จานสีตั้งค่า เบื้องหน้า (ด้านบน) swatch เป็นสีที่คุณต้องการให้เฟรมเป็น (ในกรณีนี้เราใช้สีแดง) และตั้งค่า พื้นหลัง (ด้านล่าง) swatch เพื่อความโปร่งใสโดยคลิกที่ไอคอน Checkerboard ขนาดเล็กภายใต้ swatch.
ใน ตัวเลือกเครื่องมือ Palette ปรับไฟล์ ความกว้าง การตั้งค่าเพื่อให้หนาพอที่จะโดดเด่น. คุณอาจต้องปรับการตั้งค่านี้สองสามครั้งเพื่อให้ได้ความกว้างที่เหมาะสมกับขนาดของรูปภาพของคุณ.
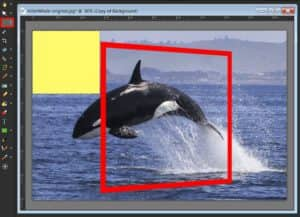
กับ สี่เหลี่ยมผืนผ้า เครื่องมือคลิกและลากรูปภาพของคุณเพื่อวาดสี่เหลี่ยมเพื่อให้ส่วนหนึ่งของภาพถ่ายอยู่นอกเฟรมในกรณีนี้หัววาฬ.
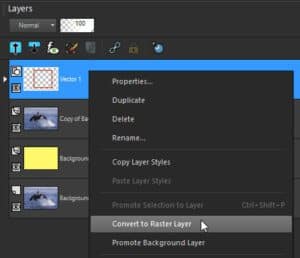
เนื่องจากสี่เหลี่ยมผืนผ้าเป็นวัตถุเวกเตอร์จึงถูกสร้างขึ้นบนชั้นเวกเตอร์ของตัวเอง. แต่สำหรับการดัดแปลงที่จำเป็นต้องทำในเฟรมนี้สี่เหลี่ยมต้องเป็นวัตถุแรสเตอร์. นี่เป็นเรื่องง่ายที่จะทำ: คลิกขวาที่เลเยอร์ใน ชั้น จานและเลือก แปลงเป็นเลเยอร์แรสเตอร์.
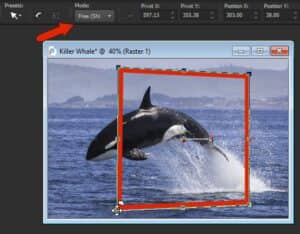
เพื่อให้เฟรมดู 3 มิติเปิดใช้งานไฟล์ เลือก เครื่องมือและตั้งค่าไฟล์ โหมด ถึง ฟรี ใน ตัวเลือกเครื่องมือ จานสี. ตอนนี้ใช้ไฟล์ เลือก เครื่องมือในการเลื่อนทั้งสองโหนดทางซ้ายขึ้นและลง.
ขั้นตอนที่ 3: ถอดพื้นหลังออกนอกเฟรม
ตอนนี้เราต้องลบชิ้นส่วนของภาพถ่ายด้านนอกเฟรม. ใน ชั้น จานสีคลิกที่เลเยอร์ภาพถ่ายที่คัดลอกเพื่อให้เป็นเลเยอร์ที่ใช้งานอยู่.
เปิดใช้งานไฟล์ การเลือก เครื่องมือและใน ตัวเลือกเครื่องมือ จานสีตั้งค่า ประเภทการเลือก ถึง สี่เหลี่ยมผืนผ้า และ โหมด ถึง แทนที่. คลิกและลากบนรูปภาพของคุณเพื่อสร้างพื้นที่เลือกจากนั้นกด ลบ กุญแจสำคัญในการลบ. กด Ctrl + d เพื่อยกเลิกการเลือกพื้นที่ที่คุณเพิ่งลบ.
ทำตามขั้นตอนเหล่านี้อีกครั้งเพื่อลบพื้นที่อื่นนอกเฟรม.
เคล็ดลับ: ในกรณีที่มีพื้นที่ที่ไม่ใช่รูปสี่เหลี่ยมผืนผ้าเช่นรูปทรงสี่เหลี่ยมคางหมูด้านบนและด้านล่างเฟรมให้สลับไปใช้ การเลือกด้วยมือเปล่า เครื่องมือและตั้งค่าไฟล์ ประเภทการเลือก ถึง จุดต่อจุด. คลิกหนึ่งครั้งที่จุดเริ่มต้นจากนั้นคลิกที่ 2 มุมถัดไปของรูปร่าง. ดับเบิลคลิกที่มุมที่สี่เพื่อให้พื้นที่เลือกเสร็จสมบูรณ์จากนั้นกด ลบ กุญแจสำคัญในการลบ.
สำหรับพื้นที่ที่เหลือใด ๆ ที่จำเป็นต้องลบออกคุณสามารถใช้ไฟล์ ยางลบ เครื่องมือและ ยางลบพื้นหลัง เครื่องมือ. ใน ตัวเลือกเครื่องมือ จานสีตั้งค่า ความแข็ง ถึง 100 และปรับไฟล์ ขนาด หากจำเป็น (คุณสามารถปรับขนาดแปรงได้โดยกดปุ่ม Alt กุญแจและลากขึ้นหรือลงบนรูปภาพของคุณด้วยไฟล์ ยางลบ เครื่องมือ).
ใช้ ยางลบ เครื่องมือสำหรับพื้นที่ที่ไม่ได้อยู่ใกล้กับเรื่องของคุณในกรณีนี้หัววาฬ.
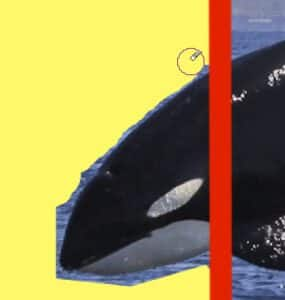
จากนั้นสลับไปที่ ยางลบพื้นหลัง เครื่องมือสำหรับพื้นที่ที่อยู่ใกล้กับเรื่องของคุณ. ที่ ยางลบพื้นหลัง ลบพิกเซลที่มีสีเดียวกันกับที่คุณคลิก. คุณอาจต้องปรับไฟล์ ความอดทน การตั้งค่าใน ตัวเลือกเครื่องมือ Palette ขึ้นอยู่กับว่าสีพื้นหลังของคุณใกล้เคียงกับสีวัตถุของคุณอย่างใกล้ชิดเพียงใด. สีเหลืองสดใสที่เราเลือกสำหรับชั้นพื้นหลังทำให้ง่ายต่อการดูว่าต้องถอดพิกเซลแบบไหน.

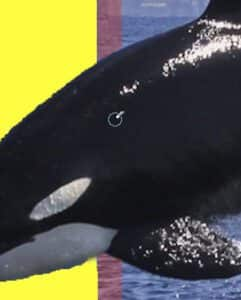
ขั้นตอนที่ 4: ลบเฟรมด้านหลังเรื่อง/วัตถุของคุณ
เมื่อพื้นหลังถูกลบออกจากรอบด้านนอกของเฟรมขั้นตอนต่อไปคือการลบส่วนของเฟรมที่ควรอยู่ด้านหลังหัวเรื่อง/วัตถุ 3 มิติของคุณ (i.อี. หัววาฬ).
ใน ชั้น จานสีคลิกที่เลเยอร์เฟรมเพื่อให้เป็นเลเยอร์ที่ใช้งานอยู่. ปรับ ความทึบแสง ตัวเลื่อนเพื่อลดความทึบของเลเยอร์นี้เพื่อให้ง่ายต่อการดูว่าคุณต้องลบที่ใด.
ตอนนี้ใช้ไฟล์ ยางลบ เครื่องมือในการลบชิ้นส่วนของเฟรมที่ควรอยู่ด้านหลังวาฬ. เมื่อเสร็จแล้วให้นำความทึบของเลเยอร์กลับมาถึง 100.
ขั้นตอนที่ 6: เพิ่มพื้นหลังใหม่ (ไม่บังคับ)
พื้นหลังสีเหลืองสดใสที่เราสร้างขึ้นในตอนแรกมีประโยชน์มากเมื่อลบ แต่ไม่ใช่รูปลักษณ์ที่เราต้องการสำหรับภาพถ่าย 3 มิติสุดท้ายของเราดังนั้นเราจะแทนที่ด้วยรูปแบบแทน.
ใน ชั้น Palette คลิกที่เลเยอร์พื้นหลังสีเหลืองเพื่อให้เป็นเลเยอร์ที่ใช้งานอยู่. ใน วัสดุ Palette คลิกที่ เบื้องหน้า (บนสุด) swatch เพื่อเปิดไฟล์ คุณสมบัติของวัสดุ หน้าต่าง. เลือก ลวดลาย แท็บจากนั้นเลือกรูปแบบที่คุณต้องการใช้ (เราใช้ไฟล์ สีร้าว ลวดลาย). เปิดใช้งานไฟล์ เติมน้ำท่วม เครื่องมือและคลิกที่ภาพของคุณเพื่อเติมเต็มรูปแบบ.

เอฟเฟกต์ภาพถ่าย 3 มิติพร้อมรูปถ่ายสองภาพ
เทคนิคนี้สามารถใช้กับชุดภาพสองภาพได้เช่นกัน. สำหรับตัวอย่างนี้เรากำลังใช้ภาพถ่ายของเฟรมที่แขวนอยู่บนผนังและภาพถ่ายของจิ้งจก. เราจะใช้เทคนิคการถ่ายภาพ 3 มิติเพื่อให้ดูเหมือนจิ้งจกกำลังออกมาจากเฟรม.
ในรูปภาพของเฟรมบนผนังเฟรมที่เต็มไปด้วยสีขาวและเราจำเป็นต้องลบมันออกและแทนที่ด้วยจิ้งจก. ในการลบพิกเซลภายในกรอบรูปภาพก่อนอื่นเราต้องโปรโมต พื้นหลัง เลเยอร์เพื่อให้มันกลายเป็นเลเยอร์แรสเตอร์. ใน ชั้น Palette คลิกขวาที่ พื้นหลัง เลเยอร์และเลือก ส่งเสริมเลเยอร์พื้นหลัง.
เนื่องจากพื้นที่ที่จะลบเป็นพื้นที่สี่เหลี่ยมสีทึบเราจึงสามารถใช้ การเลือก เครื่องมือได้อย่างง่ายดาย. เปิดใช้งานไฟล์ การเลือก เครื่องมือและคลิกและลากเพื่อสร้างพื้นที่เลือกรอบพื้นหลังสีขาวจากนั้นกด ลบ.
ตอนนี้เราต้องเพิ่มภาพจิ้งจกลงในภาพถ่าย. คุณสามารถทำได้โดยการคัดลอก (Ctrl + ค) ภาพถ่ายจิ้งจกและวางมัน (Ctrl + V) ลงบนภาพเฟรมรูปภาพหรือโดยการลากมันลงใน ชั้น จานสี. เมื่อเพิ่มภาพจิ้งจก ชั้น Palette จะลดความทึบของชั้น.
เปิดใช้งานเลเยอร์จิ้งจกและใช้ไฟล์ เลือก เครื่องมือใน มาตราส่วน โหมดเพื่อปรับขนาดและย้ายเข้าที่.
กลับไปที่เลเยอร์เฟรมใช้ไฟล์ ยางลบ เครื่องมือที่มีขนาดแปรงขนาดเล็กเพื่อลบส่วนของเฟรมที่ควรอยู่ด้านหลังหัวจิ้งจกอย่างระมัดระวังรวมถึงพิกเซลทั้งหมดที่ปิดกั้นหัวของจิ้งจก.
เมื่อเสร็จแล้วให้นำความทึบของเลเยอร์กลับมาถึง 100. และตอนนี้เรามีผลงานชิ้นเอกของพิพิธภัณฑ์ใหม่!